1. Follow the before repair procedure and perform the fuel line safety procedure. (See BEFORE REPAIR PROCEDURE.)
2. Disconnect the negative battery cable. (See BATTERY REMOVAL/INSTALLATION.)
3. Disconnect the engine compartment side quick release connector. (See QUICK RELEASE CONNECTOR REMOVAL/INSTALLATION.)
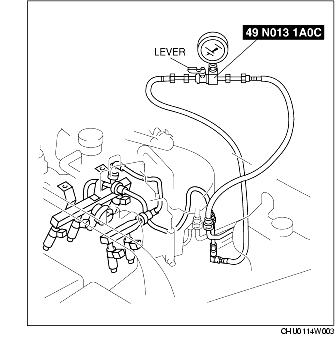
4. Turn the lever of the SST parallel to the hose as shown in the figure.
5. Reconnect the quick release connector of the SST to the fuel pipe until a click is heard.
6. Verify that the quick release connector is firmly connected by pulling it by hand.
7. Connect the negative battery cable.
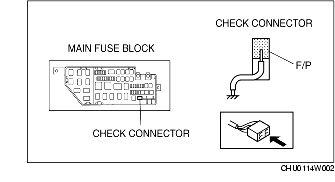
8. Ground the check connector terminal F/P using the jumper wire.
9. Turn the ignition switch to the ON position and operate the fuel pump.
10. Measure the fuel line pressure.
11. Disconnect the jumper wire and stop the fuel pump.
12. Wait 5 min and measure the fuel hold pressure.
13. Disconnect the SST.
14. Connect the quick release connector. (See QUICK RELEASE CONNECTOR REMOVAL/INSTALLATION.)
15. Inspect all parts by performing the "AFTER REPAIR PROCEDURE". (See AFTER REPAIR PROCEDURE.)