1. Remove the engine cover.
2. Remove the battery cover.
3. Disconnect the negative battery cable.
4. Drain the ATF. (See AUTOMATIC TRANSMISSION FLUID (ATF) REPLACEMENT.)
5. Remove the oil pan and gasket.
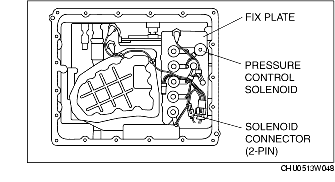
6. Disconnect the solenoid connector (2-pin).
7. Remove the fix plate.
8. Remove the pressure control solenoid.
9. Apply ATF to a new O-ring and install it on the solenoid valve.
10. Install the pressure control solenoid in the control valve body.
11. Install the fix plate.
12. Connect the solenoid connector (2-pin).
13. Install the oil pan and new gasket to a new oil pan installation bolts.
14. Connect the negative battery cable.
15. Install the battery cover.
16. Install the engine cover.
17. Add ATF and, with the engine idling, inspect the ATF level and inspect for leakage. (See AUTOMATIC TRANSMISSION FLUID (ATF) REPLACEMENT.) (See Automatic Transmission Fluid (ATF) Level Inspection.)
18. Perform the time lag test and line pressure test. (See MECHANICAL SYSTEM TEST.)
19. Perform the road test. (See ROAD TEST.)
1. Remove the engine cover.
2. Remove the battery cover.
3. Disconnect the negative battery cable.
4. Drain the ATF. (See AUTOMATIC TRANSMISSION FLUID (ATF) REPLACEMENT.)
5. Remove the oil pan and gasket.
6. Disconnect the solenoid valve connector.
7. Remove the fix plate.
8. Remove the solenoid valve.
9. Apply ATF to a new O-ring and install it on the solenoid valve.
10. Install the solenoid valve in the control valve body.
|
Solenoid valve
|
Harness color
|
|---|---|
|
Shift solenoid A
|
Orange
|
|
Shift solenoid B
|
Blue
|
|
Shift solenoid C
|
Green
|
|
Shift solenoid F
|
Red
|
|
TCC solenoid
|
Yellow
|
11. Install the fix plate.
12. Connect the solenoid valve connector.
13. Install the oil pan and new gasket to a new oil pan installation bolts.
14. Connect the negative battery cable.
15. Install the battery cover.
16. Install the engine cover.
17. Add ATF and, with the engine idling, inspect the ATF level and inspect for leakage. (See AUTOMATIC TRANSMISSION FLUID (ATF) REPLACEMENT.) (See Automatic Transmission Fluid (ATF) Level Inspection.)
18. Perform the time lag test and line pressure test. (See MECHANICAL SYSTEM TEST.)
19. Perform the road test. (See ROAD TEST.)